

Instagram Map, a new feature inspired by Snapchat’s Snap Map, makes it easy to share your location with friends. In fact, it’s so effortless that you might not even realize who can see your location without carefully reviewing your settings. This has understandably caused some confusion among users about how the feature actually works.
If you’re already an active Instagram user and want to explore where your friends have been, it’s helpful to understand how Instagram Map functions. And if you’re concerned about what location information might be shared without your awareness, it’s a good idea to get acquainted with the feature’s privacy settings. Here’s how to navigate both aspects within the Instagram app.
What is the Instagram Map?
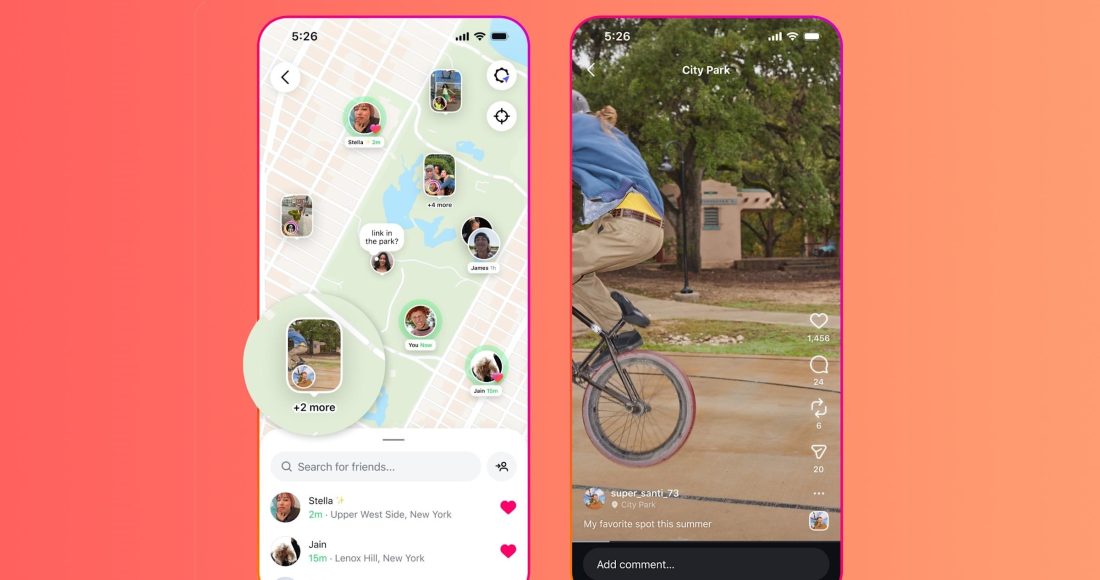
Before diving into the “how,” it’s essential to understand the “what.” The Instagram Map is not a separate app but a feature within your Instagram profile. It automatically collects and displays all the public posts you’ve shared with a specific location tag (geotag) on an interactive map.
This map serves as a visual scrapbook of your journeys, allowing anyone who visits your profile to see not just what you did, but where you did it. They can zoom in on cities you’ve visited, see clusters of posts from your favorite neighborhoods, and get a geographical story of your life.
How to Use Instagram Map?
Using the Instagram Map is primarily a passive process; it populates itself based on your posting activity. However, knowing how to access and interpret it is key.
Accessing Your Own Map:
-
Open your Instagram profile by tapping your profile picture in the bottom right corner.
-
Just above your grid of posts, you will see a series of icons: a grid icon, a play button for Reels, and a person-shaped icon for tagged posts.
-
Directly to the right of these, you will see a small map pin icon or, on some versions, a navigation arrow icon. Tap on it.
-
This will open your Instagram Map. It displays a world map with clusters of pins in locations where you’ve posted.
Navigating the Map:
-
Zoom and Pan: You can pinch to zoom in and out on the map or drag it around to explore different areas.
-
Location Clusters: In areas where you have multiple posts (like your hometown), the posts will be grouped into a cluster with a number. Tap on the cluster to zoom in and see individual pins.
-
Viewing Posts: Tap on any individual pin on the map. A preview of the post you shared from that exact location will appear. Tap on the preview to open the full post as it appears in your feed.
Using Others’ Maps for Discovery:
The map isn’t just for self-reflection; it’s a powerful discovery tool.
-
Visit the profile of a traveler, a food blogger, or a friend whose taste you trust.
-
Tap on their map icon.
-
You can now explore the places they’ve been. This is an excellent way to find new restaurants, hidden gems in a city you’re planning to visit, or to simply learn more about someone’s experiences through a geographical lens.
The following table summarizes the key aspects of using the map:
| Action | How to Do It | Purpose |
|---|---|---|
| View Your Map | Profile > Tap Map Pin Icon | To see a visual history of your geotagged posts. |
| View Someone’s Map | Go to their Profile > Tap their Map Pin Icon | To discover new places based on someone else’s travels. |
| Find a Specific Post | Zoom into the map cluster and tap the individual pin. | To locate and re-live a memory from a specific location. |
How to Stop Sharing Your Location with Instagram Map?
Perhaps you’ve been an avid user of geotags in the past but now wish to reclaim your privacy. Maybe you don’t want your entire travel history to be public information. Fortunately, Instagram provides ways to retroactively remove your location data from the map.
It’s crucial to understand that the Map is a reflection of your posts’ geotags. Therefore, to remove a location from the map, you must remove the geotag from the post itself. There are two main approaches: removing location from individual posts or from multiple posts at once.
Remove Location from Individual Posts (Most Precise)
This method is best if you only want to remove a few specific posts from your map.
-
Navigate to the post you want to edit.
-
Tap the three dots (
...) in the top right corner of the post. -
Select
Editfrom the menu that appears. -
At the top of the edit screen, directly below the image, you will see the location name you added. Tap on it.
-
A list of locations will appear. Tap
Delete Locationat the top of this list. -
Tap
Done(on iOS) or the check mark (on Android) in the top right corner to save your changes.
The post will immediately disappear from your Instagram Map. The post itself remains live on your profile, but it is no longer tied to a specific place on the map.
Remove Location from Multiple Posts (Batch Editing)
If you want to clear your entire map or remove locations from many posts at once, editing each one individually is tedious. While Instagram doesn’t have a “remove all locations” button, you can use the “Archive” feature effectively.
-
Go to your profile and tap the map pin icon to open your Map.
-
Find a cluster of posts in a location you want to remove.
-
Zoom in and tap on a pin to view the post.
-
Tap the three dots (
...) on that post and selectArchive. -
The post will be removed from your public profile and your map and moved to your private Archive folder. You can later unarchive it if you wish, but it will return without the location tag if you edited it in Step 4 above.
To mass-remove locations, you would need to repeat this process for each post on your map. Alternatively, third-party desktop tools (use with caution and ensure they are reputable) can sometimes help manage this process faster by allowing you to edit multiple posts from a computer.
How to Never Share Specific Locations on Instagram Map?
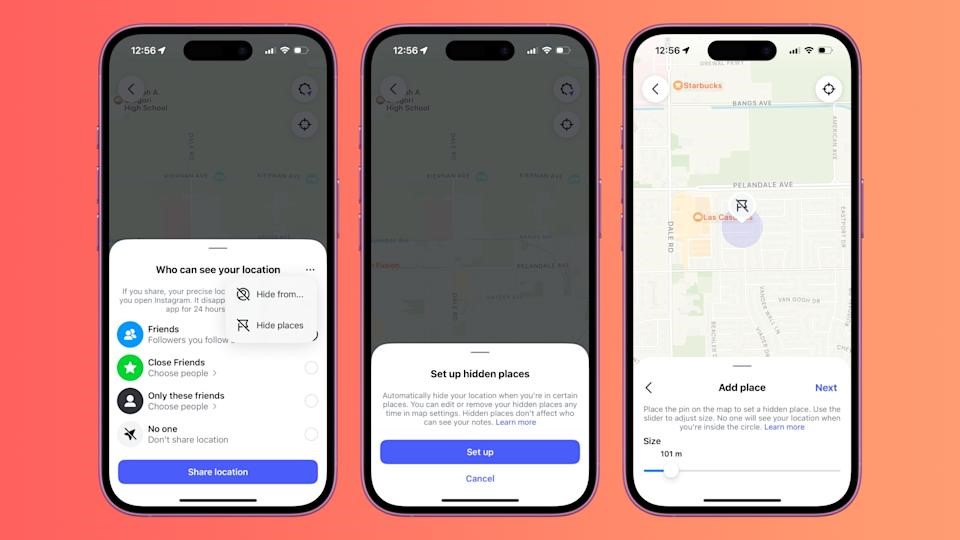
The most effective privacy strategy is prevention. By changing your habits before you post, you can ensure sensitive locations never appear on your map in the first place.
The Simple Solution: Don’t Add a Geotag
This is the most straightforward method. When you are composing a new post and reach the final screen before sharing (where you write your caption), you will see an option to Add Location.
-
To prevent sharing: Simply do not tap this option. Leave the location field blank.
-
Post without a location: Your post will share the content with your followers without pinning it to any map, public or private.
Use a Vague or Fictional Location
Sometimes, you want to convey the general area you’re in without giving away your exact spot. In this case, you can use a broader, more generic location tag.
-
Instead of tagging “Joe’s Coffee Shop,” you could tag the neighborhood: “SoHo.”
-
Instead of tagging your exact home address, you could tag the city: “Austin, Texas.”
-
You can even use humorous or fictional locations that sometimes appear in the search, like “The Shire” or “Middle Earth.”
This satisfies the desire to add context to your post without compromising your precise whereabouts.
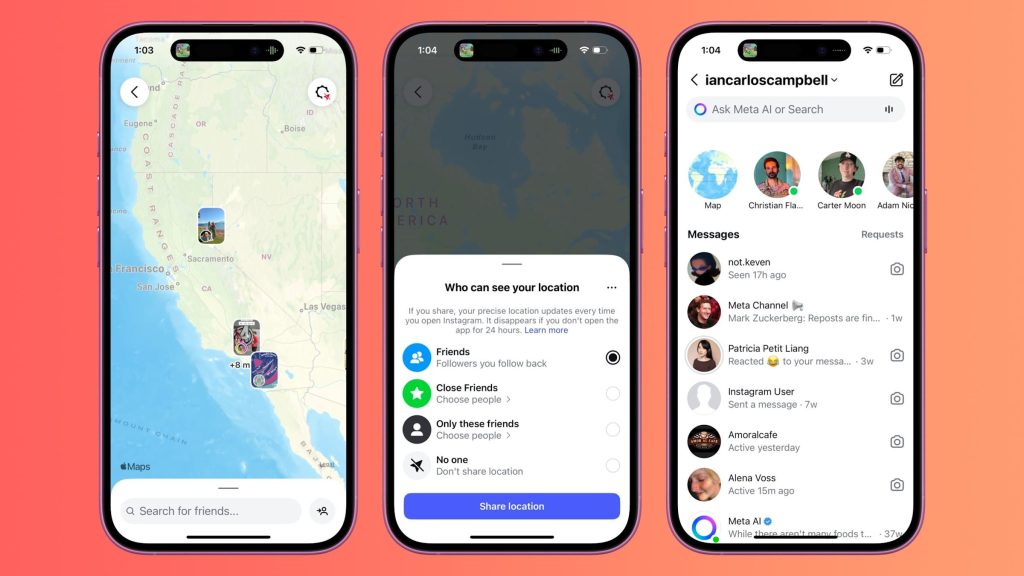
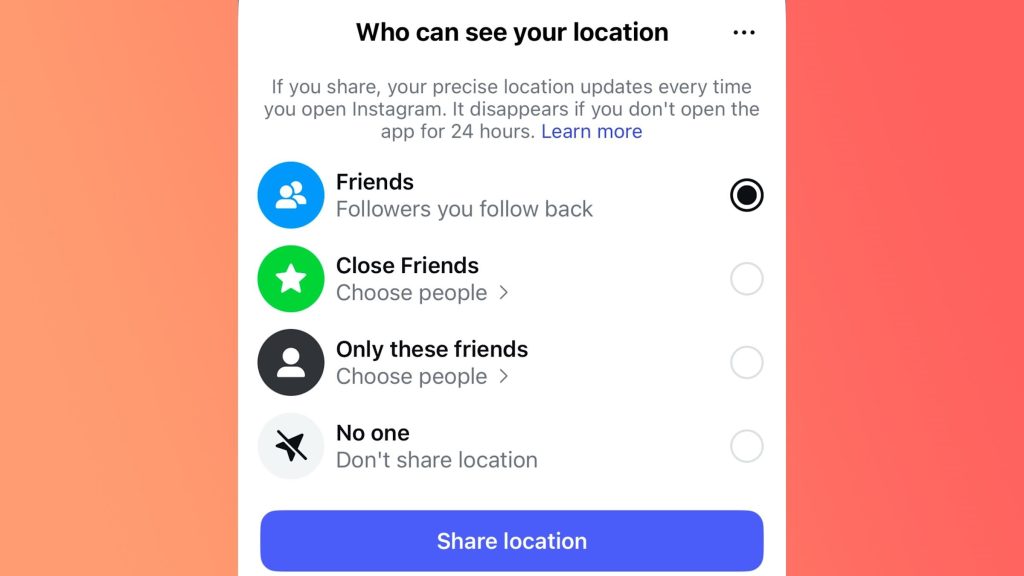
Adjust Your Default Privacy Settings
While there’s no setting labeled “Turn off Map,” your overall account privacy is your first line of defense.
-
Switch to a Private Account: This is the single biggest step you can take for overall privacy.
-
Go to Settings > Privacy > Account Privacy and toggle on Private Account.
-
With a private account, only your approved followers can see your posts—and by extension, your map. This significantly reduces the audience of your location data, though your followers can still see it.
-
Be Mindful of Stories and Reels
-
Stories: The same principles apply. The location sticker will add that story to your map. Avoid using it if you don’t want the location recorded.
-
Reels: The location tag on a Reel will also place it on your map.
Conclusion: To Map or Not to Map?
The Instagram Map is a double-edged sword. It’s a fantastic tool for storytellers, travelers, and businesses looking to showcase their physical presence. It allows for rich discovery and helps build a visually appealing narrative of a life well-traveled.
However, in an age where digital privacy is paramount, it also presents a potential risk. Oversharing your location can have implications for your personal safety and digital security.
The power, fortunately, remains entirely in your hands. You can choose to embrace the map as a public journal, lock it down for only your closest friends to see by making your account private, or disable it entirely by being vigilant about never adding geotags and retroactively removing old ones. By understanding the settings and options detailed in this guide, you can make an informed choice that perfectly balances sharing with privacy.

